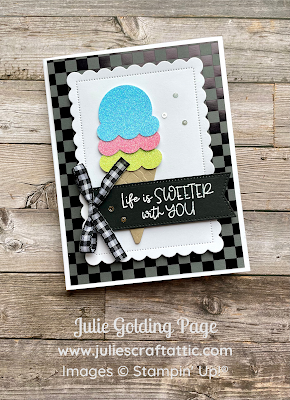
Friends, I had so much fun using the Strawberry Builder Punch from the Clearance Rack in last week's Facebook Live, that I decided to try another Clearance punch! If you missed last week's project, you can find it here.
This week's card features the Ice Cream Cone Builder Punch, which retails for just $14.40 CAD. I'll include a clickable photo supply list for you at the end of this post.
Click here to view my demo
To make the card, I started with die cutting. I used my Mini Stampin' Cut & Emboss Machine with:
- Scalloped Contours Dies to cut the 2nd largest rectangle from Basic White Cardstock
- Stylish Shapes Dies to cut the longest label from Basic Black Cardstock
- Share a Milkshake Dies to cut the waffle cone from Crumb Cake Cardstock
Next, I adhered the scalloped rectangle to the card base using Stampin' Dimensionals. I then pieced together the ice cream cone, adhering it to the card with Stampin' Seal. I think the 2022-2024 In Color Glimmer Paper is perfect for ice cream, with its beautiful colours and sparkle. Bonus - the glitter doesn't flake off, so no glitter storm in your house! Here's the paper, in all 5 current In Colors:
I layered on the label with Stampin' Dimensionals, then used Mini Glue Dots to attach a bow made with Black & White Gingham Ribbon. The final touch was embellishing with Sparkle & Shine Sequins Assortment. I used the putty end of my Take Your Pick tool to pick them up, adhering them on tiny dots of Multipurpose Liquid Glue.
Special Offers
🛍 Shop with Me using Host Code YZFVA3SE & receive:
- FREE tutorial bundle featuring Playing in the Rain Bundle
- FREE card of the month
No selling required. You don’t even have to buy anything else, ever!
Product List


No comments:
Post a Comment
How lovely of you to take the time to write a comment. Thank you - merci - woliwon!