Hello from beautiful St Stephen, New Brunswick, on Canada's Atlantic coast!
Today I'm delighted to welcome folks from all over the world, as part of the fabulous Demonstrator Training Program Blog Hop organized by our intrepid leaders, Kylie & Bruno Bertucci in Australia. We're showcasing the cards we make to say thank you to our lovely customers. You'll find the full list of blog links at the bottom of this post.
This is my first time participating in a blog hop, and it's also Thanksgiving weekend here in Canada, so the timing is perfect to express my gratitude. Without further ado, thank you, Kylie & Bruno, and thank you also to all the customers who so kindly craft with me, support my small business, and have become friends. And thank you so much, dear reader, for visiting my blog today! I see you. 💖
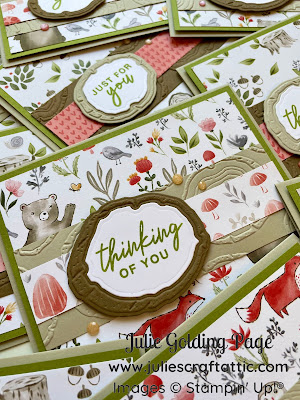
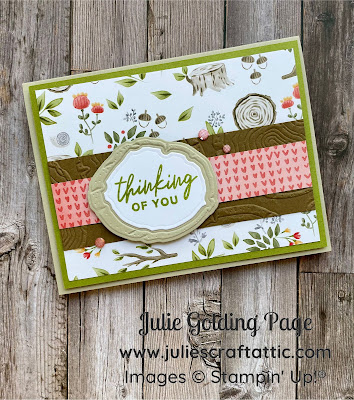
My October customer card features the whimsical Happy Forest Friends Designer Series Paper (DSP) and Ringed with Nature Bundle. My colour scheme reflects a selection of emerging autumn colours here in southwestern New Brunswick: Sahara Sand, Old Olive, Calypso Coral, and Soft Suede. Here's a version of the card made with one pattern of DSP:
To make my card, I first used the Tree Rings Hybrid Embossing Folder from the Bundle to create the embossed tree ring from Soft Suede. This combo of die and embossing folder is a brilliant time saver, as you can emboss and cut at the same time! To use it, you simply open the embossing folder and line up the large die of several tree rings with the pattern inside the folder. After it clicks into place, you insert your paper and crank it through your die-cutting machine like any 3D embossing folder. Voila, cut & embossed pieces in one easy step!
Once I had the embossed tree ring, I used a separate die from the Bundle to cut the Basic White insert. Using an Old Olive ink pad, I then stamped a sentiment from the Ringed with Nature stamp set (also in the Bundle) onto the insert. To finish, I glued the stamped insert to the embossed tree ring.
Next I used the embossing folder again - this time without the dies - to emboss a 1 3/4" x 5" piece of Soft Suede Cardstock. From there, it was a matter of assembly. I cut and scored a 5 1/2" x 8 1/2" Sahara Sand card base. Then I adhered a 3 3/4" x 5" panel of Happy Forest Friends DSP to a 4" x 5 1/4" Old Olive panel. I added the embossed Soft Suede cardstock, then layered on a 7/8" x 5" strip of DSP in a different pattern. I attached the stamped tree ring with dimensionals, then added Fine Sparkle Adhesive Backed Gems for a little bling.
This paper lends itself to several different versions of the same basic design, simply swapping out the colours and patterns. Here's the same card, switching some of the Sahara Sand and Soft Suede elements, the DSP pattern choice, and the colour of gems:
I also invite you to follow my blog & share it with your friends:
Thanks so much for stopping by during this blog hop! I'd love it if you'd tell me in the comments below where you're from. And don't miss hopping over to all the other fabulous card projects from around the globe:


Cute card! This bundle makes me smile!
ReplyDeleteI love this paper, your cards are beautiful!
ReplyDeleteBeautiful card! I love how you used the rings of love with this dsp they go so well together <3
ReplyDeleteSo adorable!
ReplyDeleteCute card! Love the way you used the DSP.
ReplyDeleteGreat card Julie! Love all the texture you created.
ReplyDeleteGreat Card, Julie. I really love this set.
ReplyDeleteLovely card Julie! Thank you for taking part in our Demonstrator Training Blog Hop this month!
ReplyDeleteVery nice Card!
ReplyDeleteNice card!
ReplyDelete