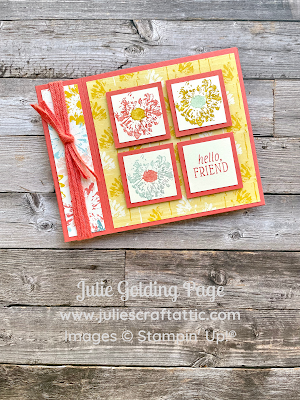
Today I have a bookbinding fold card for you. I met Margie last week and she really liked this style of card - so Margie, this one's for you! 😊
If there's a particular kind of card you like, friends, let me know and I'll see what I can do!
Here's my card:
A clickable photo supply list is at the end of this post.
I'm glad to share some tips for colouring on stamps with markers:
- Use only Stampin' Write Markers, which are water-based. The Stampin' Blends markers are alcohol-based and can degrade your stamps' surface.
- Use the brush tip of the marker, angled onto its side, for best coverage.
- Colour with a fairly light hand to avoid pressing hard and damaging the marker's brush tip.
- Markers allow for blending between colours, making a watercolour-like effect, so have some creative fun!
- Experiment on scrap paper to see how the markers & stamps interact, before working on your project.
Here's the set of Subtles Stampin' Write Markers:
The rest of the card was all about assembly. I began by attaching each stamped square to a matching 1 1/2" Calypso Coral Cardstock square.
Next, I cut a 4 1/4" x 11" Calypso Coral Cardstock card base and scored it at both 4 1/4" and 5 1/2". I then folded the card in half on the 5 1/2" score line. With the card closed, I folded the card front back on the 4 1/4" score line, to create a 1 1/4" wide section between the two fold lines on the left side of the card. In this section, I added a 1" x 4" strip of Inked Botanicals DSP. In the remaining section on the front of the card, I added a 4" square piece of the DSP, then attached the stamped squares using Stampin' Dimensionals.
The Inked Botanicals DSP is a great autumn choice, offering earthy fall colours with a twist of Lost Lagoon & Pool Party to keep it fresh:
I then wrapped Calypso Coral 3/16" Braided Linen Trim three times around the 1 1/4" wide section of the card, so that the trim was flat. I secured the trim on the back of the front card panel with Mini Glue Dots™. I next cut 3 sections of trim each 4 inches long, feeding them through the trim on the front of the card and tying a single knot.
Then I opened the card and added adhesive to the 1 1/4" wide section on the back of the front panel. I used 3 strips of Tear & Tape, with one on each of the edges of the section and one on the trim in the middle. I removed the adhesive backing, closed the card, and pressed firmly to stick it down.
My final step was adding a 4" square of Very Vanilla Cardstock to the interior of the card as a writing surface.
Thanks so much for joining me today. Don't miss the FREE shipping offer that ends today - and my upcoming BOGO! More details on both are below.
Special Offers
Available anywhere in Canada, just from Oct 15-21. First come, first served!
Available anywhere in Canada. NEW holiday-themed classes available now!
Just in time for holiday crafting! Choose from 35% less cost - or 35% more product! No tax, no shipping in most provinces & territories.
No selling required. You don’t even have to buy anything else, ever!
Order with me & earn freebies in my new loyalty program!
Receive FREE pre-cut paper pieces in your mailbox as my thanks! (Canadian addresses only)
Click Photo to Purchase in my Online Store:


No comments:
Post a Comment
How lovely of you to take the time to write a comment. Thank you - merci - woliwon!