Warm greetings from Saint Stephen, in southwestern New Brunswick, on the Atlantic coast of Canada! I'm a 7-minute walk from the border with Calais, Maine, USA and glad to say that the two towns consider themselves to be one friendly community.
In a similar spirit of international cooperation, today's blog hop includes talented demonstrators from the USA, Australia, and Canada. We're all members of the Inspirations in Ink group, where we create a monthly tutorial bundle (info on how to get your copy is at the end of this post) and this fabulous blog hop. Don't miss the links to everyone's projects toward the end of this post!
This month's tutorial bundle and blog hop feature the brand new Framed Florets Bundle, with their super-versatile oval dies. Ce produit est également disponible en français. My card also uses the gorgeous Snowflake Specialty Vellum. I'll include a clickable photo supply list at the end of this post.
My first step for the card was to do all the die-cutting:
- Framed Florets Dies - the largest decorative oval from Silver Foil Specialty Pack paper (outside oval is for this project)
- Framed Florets Dies - the largest decorative oval from Basic White Cardstock (inside oval is for this project)
- Chic Dies - the two largest snowflakes from White Glimmer Paper
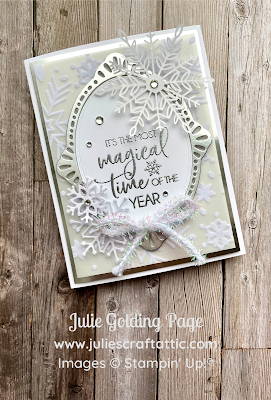
Next I stamped the sentiment from the Snowman Magic stamp set in Versamark onto the Basic White oval. I sprinkled Silver Metallic Embossing Powder over it, tapped off the excess & returned that to the jar, and then used my heat tool to emboss the sentiment into a shiny, raised texture.
For assembly, I adhered a 3 3/4" x 5" panel of the white flocked Snowflake Specialty Vellum to a 4" x 5 1/4" Silver foil panel to form a card mat. I attached the card mat to my 5 1/2" x 8 1/2" Thick White Cardstock card base with Stampin' Dimensionals. I layered on the silver and white stamped ovals with Stampin' Dimensionals, too. Then I adhered a Wonderful Snowflake with a Stampin' Dimensional and the two die-cut snowflakes with Mini Dimensionals. With Mini Glue Dots, I added a bow made from Iridescent Trim, plus some Rhinestone Basic Jewels as embellishments.
Thanks so much for checking out my Framed Florets snow-themed card. If you're in Canada and would like to purchase this versatile, multi-season bundle or any other supplies, please check out my ordering info below. And make sure to visit the other blogs for more project ideas:
Christy Gridley – USA
Deirdre Croal – USA
Rachel Aziamadi – France/Germany
Rebecca Nutley - Australia
Robbie Rubala – USA
Theresa McEntee – USA
Vicky Wright - Australia
Place an order with me in December and you'll receive our FREE international tutorial bundle featuring the Framed Florets Bundle! Plus I'll send you my handmade card of the month.
Want more card inspiration & stamping news? Sign up for my e-newsletter here.
And please follow my blog:
Thank you for stopping by, friends, and have a wonderfully crafty day!


So gorgeous & very elegant Julie. Loving the snowflakes
ReplyDeleteWow love all the snow and elegant white on this card.
ReplyDeleteGorgeous Julie!! Love the snowflakes and all the silver!! 😊
ReplyDeleteWo! Gorgeous! I love the Snowflake Specialty Vellum and how the other elements of your card complement it!
ReplyDeleteBeautiful card Julie! I love the colors you used.
ReplyDeleteWow it's just beautiful in these colours, brilliant idea
ReplyDelete