Welcome from Saint Stephen, New Brunswick, Canada! I'm just across the border from Calais, Maine, USA. Both communities are part of the traditional territory and current home of the Passamaquoddy, and I'm grateful that they share this beautiful place with us.
Today we're hopping across the Stampin' Up!® world, through Canada, USA, and Australia. You'll see cards made by talented creators from the Inspirations in Ink group. I'm honoured to be part of this international community!
Please be sure to check out the Blog Hop Links near the end of this post, to see all the other cards.
This month, we're featuring the beautiful Cheerful Daisies Bundle in both our blog hop and monthly tutorial bundle (available July 1st). A lovely seasonal choice!
I'll include a clickable photo supply list at the end of this post.
Here's a look at the bundle:
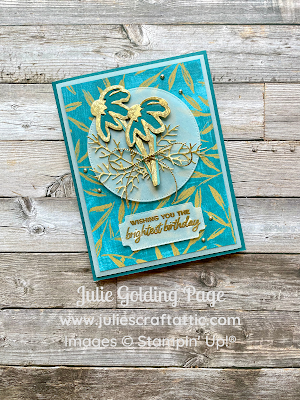
For my card, I wanted to use the Fresh as a Daisy DSP as a background, but I wanted something other than florals. So I chose a panel from the sheet of mini cards that is included in the DSP. It provided me with a colour scheme of Pretty Peacock and Wild Wheat, which looks like gold against the background.
To make this card, I started by using the Stylish Shapes Dies to cut a large circle from Vellum Cardstock. Also from Vellum, I cut the label that comes with the Cheerful Daisy Dies. This label is an added bonus with all the floral dies.
Using Cheerful Daisy Dies, I also cut out:
- 2 sprigs of greenery from Distressed Gold Specialty Paper
- 2 stems from Distressed Gold Specialty Paper
- 2 daisy outlines (meant to cut out the stamped images) from Distressed Gold Specialty Paper
- 2 daisy interiors from the outlines I'd just cut out - I set them aside and kept the outlines
- 2 detailed daisies from Pretty Peacock Cardstock
- 2 stems from Lost Lagoon Cardstock
The Distressed Gold Specialty Paper really brings out the Wild Wheat in the DSP and adds shine to the card:
Next, I stamped and embossed. Onto the Vellum label, I rubbed my Embossing Buddy to remove any humidity. Then I stamped my sentiment from Cheerful Daisies Stamp Set in VersaMark Ink.
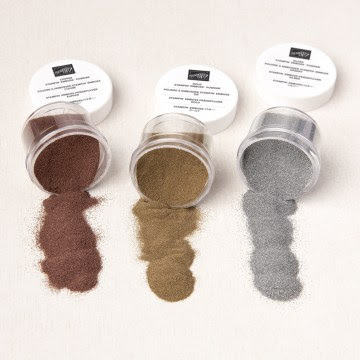
I sprinkled on Gold powder from Metallics Embossing Powders, covering the image completely, then shook off the excess and returned it to the jar. With my heat tool, I set the image until the powder turned to a shiny gold gloss.
From there, it was all assembly. I adhered my 3 3/4" x 5" Fresh as a Daisy DSP panel to a 4" x 5 1/4" Vellum Cardstock panel. Then I added them to a 5 1/2" x 8 1/2" Pretty Peacock Cardstock card base with Stampin' Dimensionals™.
Using a combination of Stampin' Dimensionals™, Stampin' Seal, Multipurpose Liquid Glue, and Mini Glue Dots™, I layered on all the die cuts. Tip: Use dry glue on the Vellum, rather than liquid glue.
To add a bit of shine, I tied a bow in Simply Elegant Trim and secured it with a Mini Glue Dot™. Then I embellished with tiny gold Festive Pearls.Friends, I hope you enjoyed my project! Please check out the other cards and also my Special Offers, below.
Blog Hop Links
Deirdre Croal – USA
Julie Golding-Page – Canada
Karen Beck - Canada
Theresa McEntee – USA
Rebecca Nutley - Australia
Robbie Rubala - USA
Christy Gridley – USA
Special Offers

Until June 30, choose $206 worth of anything you want & pay just $135! No tax, no shipping in most provinces & territories.
PLUS you gain access to Creative Cafe, my cross-Canada crafting group! I offer a $15 monthly crafting class to members.
No selling required. You don’t even have to buy anything else, ever!

Just until June 30, get 15% off select DSPs! Click here to shop now
Collect ALL the new colours - without breaking the bank!
Click here to sign up for Colour Club
Click Photo to Purchase in my Online Store:


Pretty card Julie, the papers you used are fabulous
ReplyDeleteVery pretty. I love the gold with the Pretty Peacock.
ReplyDeleteBeautiful card Julie!! Love the DSP you used!!
ReplyDeleteI love the gold accents and the limited floral, very beautiful
ReplyDelete