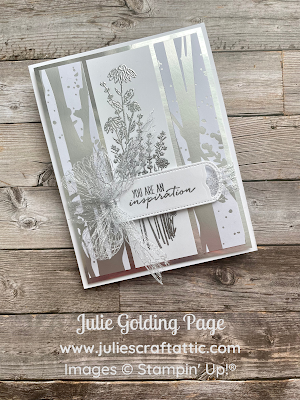
To make the silver card, I started by die-cutting my label from Basic White Cardstock, using the Waves Dies. Next, I used my Embossing Buddy to remove humidity from the cardstock. Using VersaMark Ink, I stamped my sentiment from the Dragonfly Garden Stamp Set onto the label. (Ce jeu d'estampes est également disponible en français.) Then I stamped the floral image onto a 2" x 5" strip of Basic White Cardstock.
Next, I embossed the images. I shook Silver Embossing Powder from the Metallics Embossing Powders over the images, then tapped off the excess and returned it to the jar. I used my Heat Tool to emboss both images. (If you've never used this tool before, it's as simple as using a hairdryer.) The Metallics Embossing Powders come in 3 colours: Copper, Gold & Silver:
To assemble the card, I first trimmed the edges of the floral image to turn it into a 1 1/2" x 5" rectangle. I positioned the floral image and two 1" x 5" strips of the Silver Naturally Gilded Specialty DSP on a 4" x 5 1/4" Silver Foil Specialty Pack panel. I used Grid Paper to help me centre the floral image, then adhered it with Stampin' Seal. I also adhered the Naturally Gilded strips with Stampin' Seal.
I next fed Metallic Mesh Ribbon, folded in half, through the label and attached the ribbon to the back of the Silver Foil panel with Mini Glue Dots. I like this ribbon a lot, as it adds some shine to any project:I hope you enjoyed This or That, friends! If you need some supplies, I'd be happy to have you order with me. Please check out my Special Offers below - including an upcoming BOGO!
Special Offers
🛍 Shop with Me using Host Code YZFVA3SE & receive:
- FREE tutorial bundle featuring Playing in the Rain Bundle
- FREE card of the month
Here's a Sneak Peek from the Sweet Songbirds Class:
No selling required. You don’t even have to buy anything else, ever!
💌 Thank you for stopping by, friends, and I wish you a wonderfully crafty day!


No comments:
Post a Comment
How lovely of you to take the time to write a comment. Thank you - merci - woliwon!