How's the weather where you are, friends? Here it's been very chilly with early frost in the mornings, but in the upper teens Celsius in the afternoons. Perfect weather for outdoor activities!
Here in southwestern New Brunswick, kayaking is a pastime for many, with all the rivers, lakes, and tidal waters easily at hand. And so today's card is about kayaking:
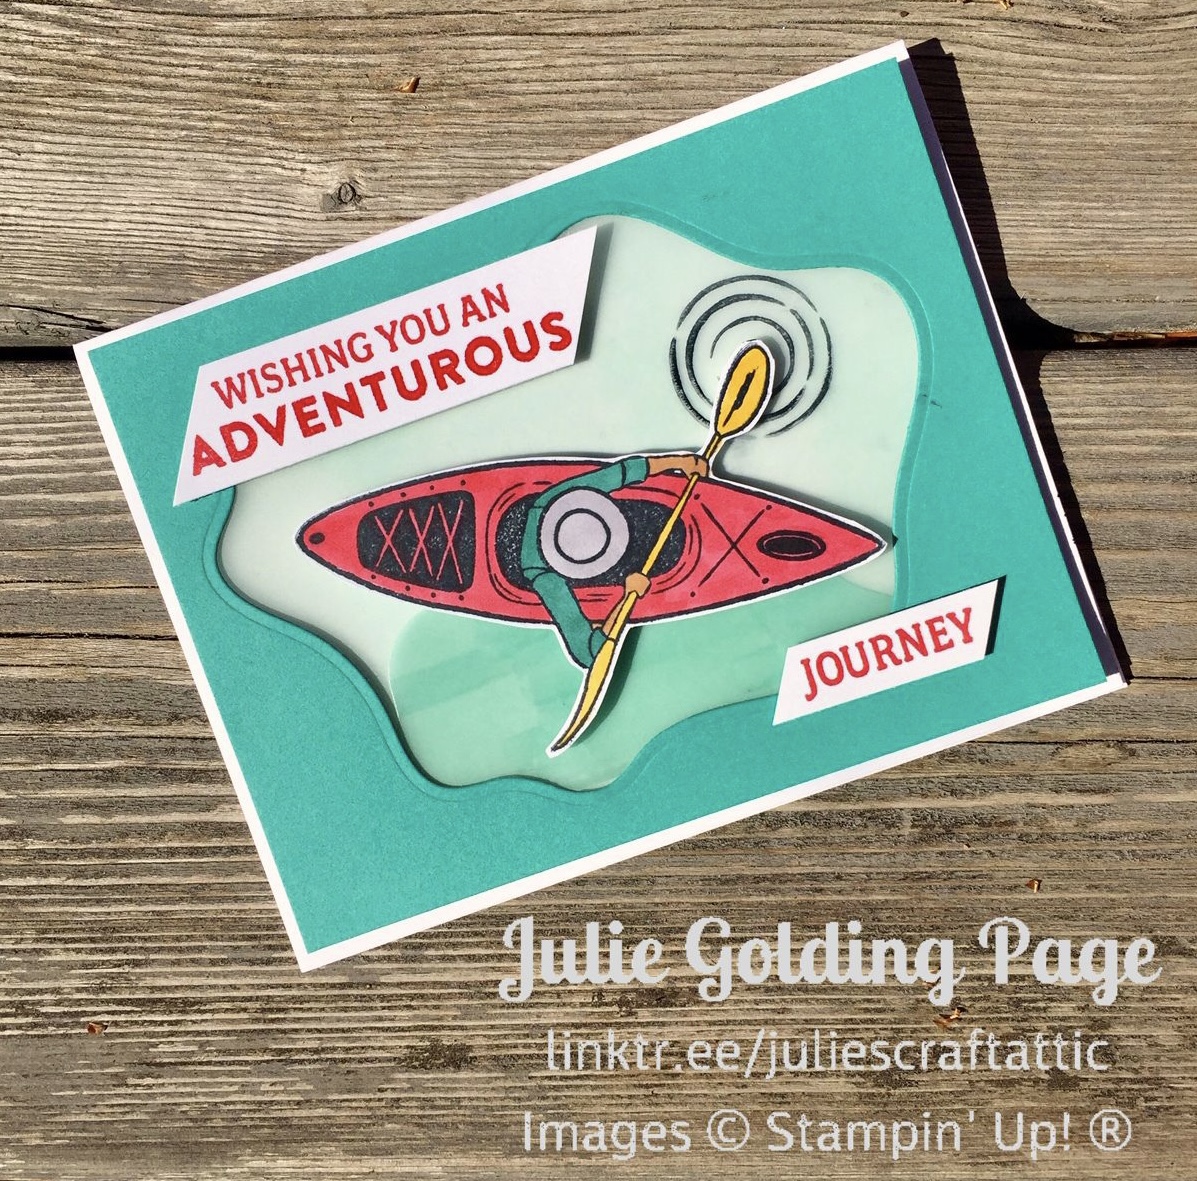
Featuring the Adventurous Journey stamp set, my card features a Bermuda Bay and Poppy Parade colour scheme. Here's how to make it:
- Stamp kayak image in Tuxedo Black Memento Ink onto scrap piece of Basic White Cardstock and colour with coordinating Stampin' Blends. I used Bermuda Bay (Dark), Daffodil Delight (Dark), Poppy Parade(Light), Smoky Slate (Light), and Medium Combo Stampin’ Blends. Cut out with Paper Snips.
- Stamp the two sentiments in Poppy Parade onto scraps of Basic White. Cut both sides of sentiment pieces on an angle.
- Colour one plain sheet of Lovely Layers Vellum with brush tip of Pool Party (Dark) Stampin’Blends and another with brush tip of Bermuda Bay (Light) Stampin’ Blends.
- Using the 3rd largest Layering Diorama Die, cut image into a 4” x 5 1/4” piece of Bermuda Bay Cardstock. Set aside the die cut and use the negative image (i.e., the 4” x 5 1/4”piece) on the card.
- Using the 4th largest Layering Diorama Die, cut the Bermuda Bay Vellum. Set aside the negative image and use the die cut image on the card (i.e., the cloud-shaped piece).
- Fold an 8 1/2” x 5 1/2” piece of Thick White Cardstock to make a card base. Burnish with bone folder.
- Along the edges of the back side of the Bermuda Bay Cardstock negative image, apply Stampin’ Seal. Adhere Pool Party Vellum.
- Position kayaker on vellum to see where to stamp water ripples. Stamp ripples in TuxedoBlack Memento Ink and allow to dry thoroughly.
- Attach cardstock/vellum piece to card base with dimensionals.
- Cut Bermuda Bay Vellum as needed, then tuck behind Bermuda Bay Cardstock at bottom of card.
- Adhere kayaker and sentiments to card base using dimensionals and Mini Dimensionals.
Watch my demo to see how I put the card together.
Want a full supply list? Just click here. You can add it to your shopping cart with a single click and edit as needed.
Need some supplies? I warmly invite you to place an order with me with host code 2WTCDTAA. You'll receive a FREE handmade card of the month AND a FREE international tutorial bundle for more crafting inspiration!
And please consider following my blog & sharing it with your friends:

What adventure will you find today, friends? Whatever it is, I wish you a lovely, crafty day.


No comments:
Post a Comment
How lovely of you to take the time to write a comment. Thank you - merci - woliwon!